Authentication integration
Choose an OIDC provider
Stellio can be configured to use any OIDC provider and works with the NGSI-LD and permissions endpoints.
The EGM Keycloak image
gives access to the subject endpoints
and allows the use of the on-owner-delete-cascade-entities property.
Common configuration
Configure the search-service
The following environment variables are needed to configure authentication in the search service:
APPLICATION_AUTHENTICATION_ENABLED: true (a boolean)APPLICATION_AUTHENTICATION_ALLOW_PUBLIC_PERMISSION: a boolean- allow the creation of permission giving read access to non-connected users.
APPLICATION_TENANTS_0_ISSUER:your-issuer-url/uri- The URL of the OIDC issuer.
- For example, a Keycloak issuer will be
https://{keycloak_url}/realms/{realm_name}
APPLICATION_AUTHENTICATION_CLAIMS_PATHS:my.claim.path,my.other.claim.path- A comma-separated list of paths, each path should correspond to a claim in the JWT generated by your OIDC provider.
- When evaluating permissions only the specified claims will be used to see if the user gets access to the resource.
- The configured claims are retrieved from the user token (as well as the user sub) and used
- default value is :
realm_access.roles,groups_uuids
Configure the subscription-service
The subscription service uses the same base variables as the search service.
Additionally, the subscription service uses client-credentials to authenticate on the search service. You should create a service account with the "stellio-admin" claim in your OIDC provider.
With this service account, the following additional variables must be defined:
APPLICATION_TENANTS_0_CLIENTID:{my-client_id}APPLICATION_TENANTS_0_CLIENTSECRET:{my-client-secret}APPLICATION_TENANTS_0_ACCESSTOKENURL:{my-access-token-url}- The access token URL of the OIDC provider.
- By default, it uses the Keycloak token URL
{issuer}/protocol/openid-connect/token
Validate the configuration
To validate the configuration is fully working, the client credentials can be used to create an entity in Stellio:
- Get an access token for this client
export ACCESS_TOKEN=$(http --form POST {my-access-token-url} client_id={client_id} client_secret={client_secret} grant_type=client_credentials | jq -r .access_token)
- Create a sample entity
echo -n '{ "id": "urn:ngsi-ld:Entity:01", "type": "Entity" }' | http POST http://localhost:8080/ngsi-ld/v1/entities Authorization:"Bearer $ACCESS_TOKEN"
If everything is correctly configured, Stellio returns a 201 Created response.
Integrate authentication with EGM Keycloak image
Stellio can be used with the Keycloak IAM solution.
This presents a basic solution to show how to setup the integration between Stellio and Keycloak. It is only meant for development purposes, please refer to Keycloak documentation to set up a production deployment.
In the remainder of this page, it is considered that Stellio is running using the docker-compose configuration provided on GitHub. Before starting this tutorial, ensure that the Stellio's Kafka broker is advertising its PLAINTEXT_HOST listener on an IP address that will be resolvable from the Keycloak container (running in its own docker network and not the same Docker network than Stellio), e.g.:
    environment:
      KAFKA_ADVERTISED_LISTENERS: PLAINTEXT://stellio-kafka:9092,PLAINTEXT_HOST://{kafka_ip}:29092
      # Other environment variables
Where kafka_ip is the IP address where the Stellio's Kafka instance is reachable outside the Docker network (e.g., your laptop or VM IP)
Keycloak will be launched using the docker-compose configuration provided later in this document, in development mode.
Connect Keycloak with Stellio
Configuration of Keycloak is not described here, as it is well documented on the Keycloak site.
In order to connect Stellio with Keycloak, the following steps have to be followed:
- Choose the correct Keycloak version
- Configure and run the Keycloak Docker image provided by EGM
- Create a realm in Keycloak
- Create the builtin roles known and used by Stellio
- Configure Keycloak to propagate user, group and client events to Stellio
- Activate and configure authentication in Stellio
Choose the correct version of Keycloak
As there are sometimes modifications in the Kafka plugin that transmits user-related events to Stellio (mainly related to modifications of the Stellio internal event model), some versions of Stellio require a minimal version of Keycloak for the communication to happen correctly.
The following table summarizes these compatibility requirements:
| Stellio version | Keycloak version |
|---|---|
| 2.25.0 | 26.3.4 |
| 2.22.0 | 26.2.0 |
| 2.19.0 | 26.0.7 |
Use the Keycloak Docker image by EGM
The provided Docker image extends the official Keycloak Docker image to bundle it with four SPIs:
- An event listener that propagates provisioning events to the Kafka message broker used by Stellio
- An account notifier that sends an email to the realm admins whenever a new account is created
- A metrics listener that exposes an endpoint that can be consumed by Prometheus (https://github.com/aerogear/keycloak-metrics-spi)
- A token mapper that maps the groups uuids of the subject into the JWT.
To start with, you can use this sample Docker compose file (do not forget to create a .env file with the environment variables used in the docker compose file):
Note: By default, Keycloak uses a local dev-file database. Even when running with the start-dev command, it is highly recommended to set KC_DB=postgres as shown below to ensure your data is properly persisted to the external PostgreSQL database.
services:
  keycloak:
    container_name: keycloak
    image: easyglobalmarket/keycloak:26.3.5
    restart: always
    environment:
      - KC_BOOTSTRAP_ADMIN_USERNAME=${KEYCLOAK_ADMIN}
      - KC_BOOTSTRAP_ADMIN_PASSWORD=${KEYCLOAK_ADMIN_PASSWORD}
      - KC_DB=postgres
      - KC_DB_URL_HOST=postgres
      - KC_DB_URL_DATABASE=${KEYCLOAK_DB_DATABASE}
      - KC_DB_USERNAME=${KEYCLOAK_DB_USERNAME}
      - KC_DB_PASSWORD=${KEYCLOAK_DB_PASSWORD}
      - KC_LOG_LEVEL=${LOG_LEVEL}
      - KC_HOSTNAME=${KEYCLOAK_HOSTNAME}
      # https://www.keycloak.org/server/configuration-provider#_configuration_option_format
      - KC_SPI_EVENTS_LISTENER_STELLIO_EVENT_LISTENER_KAFKA_BOOTSTRAP_SERVERS={realm_name}/{kafka_ip}:29092
      - KC_SPI_EVENTS_LISTENER_STELLIO_EVENT_LISTENER_KAFKA_KEY_SERIALIZER_CLASS=org.apache.kafka.common.serialization.StringSerializer
      - KC_SPI_EVENTS_LISTENER_STELLIO_EVENT_LISTENER_KAFKA_VALUE_SERIALIZER_CLASS=org.apache.kafka.common.serialization.StringSerializer
      - KC_SPI_EVENTS_LISTENER_STELLIO_EVENT_LISTENER_KAFKA_ACKS=all
      - KC_SPI_EVENTS_LISTENER_STELLIO_EVENT_LISTENER_KAFKA_DELIVERY_TIMEOUT_MS=3000
      - KC_SPI_EVENTS_LISTENER_STELLIO_EVENT_LISTENER_KAFKA_REQUEST_TIMEOUT_MS=2000
      - KC_SPI_EVENTS_LISTENER_STELLIO_EVENT_LISTENER_KAFKA_LINGER_MS=1
      - KC_SPI_EVENTS_LISTENER_STELLIO_EVENT_LISTENER_KAFKA_BATCH_SIZE=16384
      - KC_SPI_EVENTS_LISTENER_STELLIO_EVENT_LISTENER_KAFKA_MEMORY_BUFFER=33554432
      - KC_SPI_EVENTS_LISTENER_STELLIO_EVENT_LISTENER_TENANTS={realm_name}/{tenant_name}
    ports:
      # Using a different port than the ones used by Stellio to avoid conflicts when deployed on the same host
      - 9080:8080
      # Health checks
      - 9000:9000
    depends_on:
      - postgres
    command: "start-dev"
  postgres:
    container_name: postgres
    image: postgres:16-alpine
    restart: always
    volumes:
      - postgres_data:/var/lib/postgresql/data
    environment:
      POSTGRES_DB: ${KEYCLOAK_DB_DATABASE}
      POSTGRES_USER: ${KEYCLOAK_DB_USERNAME}
      POSTGRES_PASSWORD: ${KEYCLOAK_DB_PASSWORD}

volumes:
  postgres_data:
      driver: local
where:
realm_nameis the name of the realm to be created in the next sectiontenant_nameis the name of the tenant in Stellio that the realm will be binded to (see the multitenancy page for more details on this), set it tourn:ngsi-ld:tenant:defaultto use the default tenant.kafka_ipis the IP address where the Stellio's Kafka instance is reachable (e.g., your laptop or VM IP)
The .env file contains the following environment variables:
KEYCLOAK_ADMIN=keycloak
KEYCLOAK_ADMIN_PASSWORD=keycloakAdminPassword
KEYCLOAK_DB_DATABASE=keycloak
KEYCLOAK_DB_USERNAME=keycloak
KEYCLOAK_DB_PASSWORD=keycloakDbPassword
KEYCLOAK_HOSTNAME={keycloak_ip}
LOG_LEVEL=INFO
Where keycloak_ip is the IP address where Keycloak is reachable outside the Docker network (e.g., your laptop or VM IP)
Please note that for a production deployment, it is recommended to setup a certificate based authentication between Keycloak and Kafka and of course to only allow https connexions to Keycloak.
Start Keycloak
docker compose up -d
Create a realm
- Go to http://{keycloak_ip}:9080
- Authenticate to the administration console using the keycloak admin credentials defined in the docker compose configuration
- Follow instructions on how to create a new realm in Keycloak
Create the builtin roles
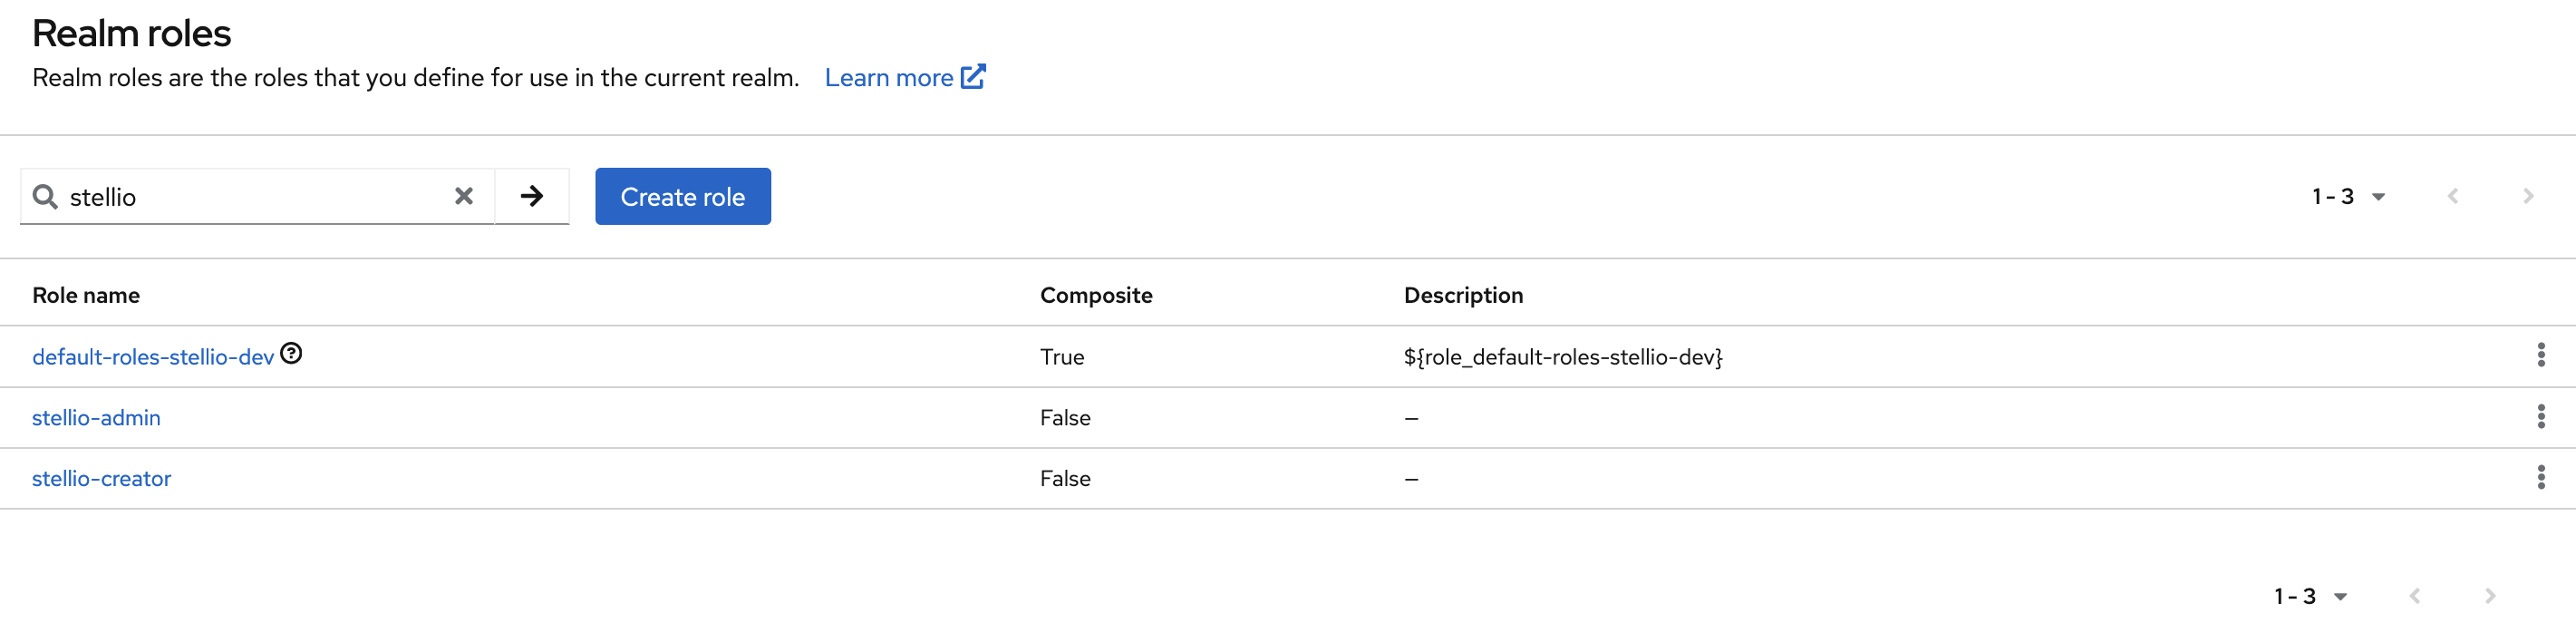
Stellio natively interprets two specific Realm roles that must first be created in Keycloak (see procedure to create a realm role):
stellio-creator: it gives a user the right to create entities in the context brokerstellio-admin: it gives a user the administrator rights in the context broker
Configure Keycloak event listener
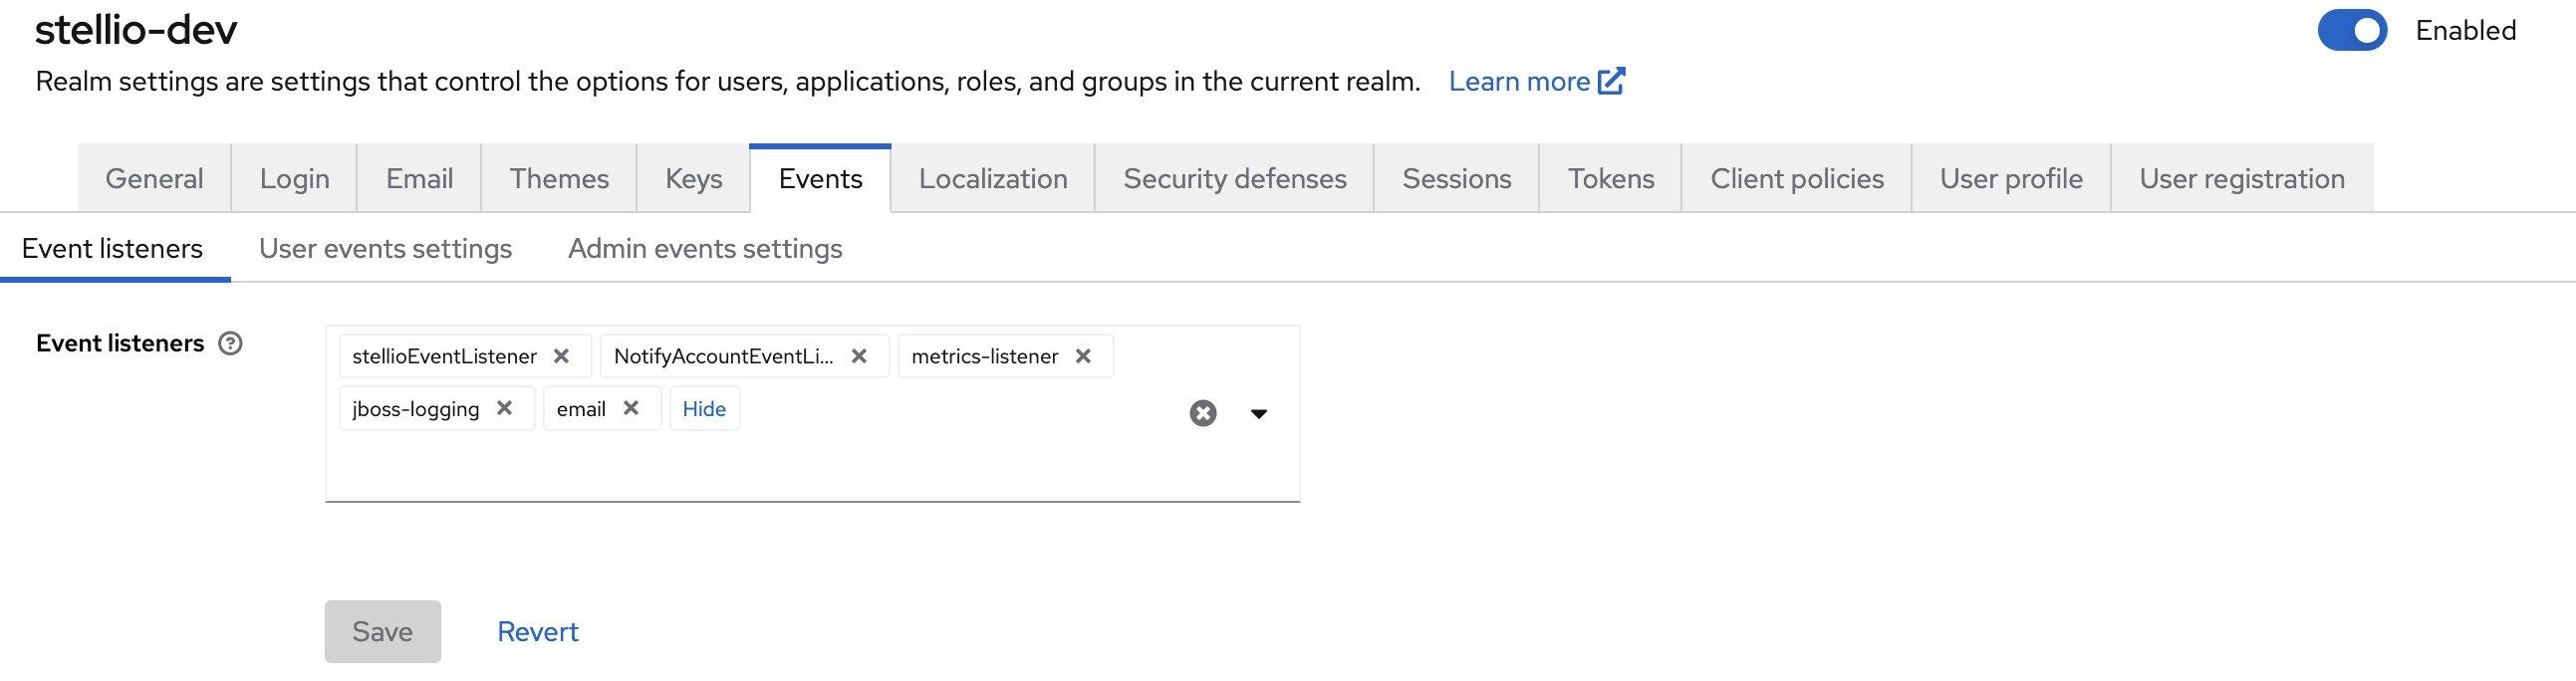
Go to the Realm settings > Events section and, in the Event listeners field, add stellioEventListener, NotifyAccountEventLister (to be notified of new accounts, the notification is sent to realm admins), and metrics-listener (if integrated with Prometheus)
Configure authentication in Stellio
Finally, on Stellio side, activate authentication and configure the Keycloak URLs in search and subscription services in Docker compose config.
In the .env file, update the following environment variables:
STELLIO_AUTHENTICATION_ENABLED=true

APPLICATION_TENANTS_0_ISSUER=http://{keycloak_ip}:9080/realms/{realm_name}
Then restart Stellio:
docker compose up -d
Validate the configuration
To validate the configuration is fully working, you can create a client in Keycloak and then create an entity in Stellio using this client:
- Create a client in Keycloak
- Enable client authentication
- Select the "Service accounts roles" authentication flow
- Do not set any redirect URIs
- In the "Service account roles" tab, assign the
stellio-creatorrealm role - In the "Credentials" tab, copy the client secret (you will need it to get an access token below)
Then in a terminal:
- Get an access token for this client
export ACCESS_TOKEN=$(http --form POST http://{keycloak_ip}:9080/realms/{realm_name}/protocol/openid-connect/token client_id={client_id} client_secret={client_secret} grant_type=client_credentials | jq -r .access_token)
- Create a sample entity
echo -n '{ "id": "urn:ngsi-ld:Entity:01", "type": "Entity" }' | http POST http://localhost:8080/ngsi-ld/v1/entities Authorization:"Bearer $ACCESS_TOKEN"
If everything is correctly configured, you should get a 201 Created response.
Events raised by Keycloak
While creating and configuring users, groups and clients in Keycloak, the following events are raised by Keycloak and sent to the Kafka message broker operated by Stellio:
- Create a user
{
  "operationType":"ENTITY_CREATE",
  "tenantName": "urn:ngsi-ld:tenant:default",
  "entityId":"urn:ngsi-ld:User:aaaaaaaa-bbbb-cccc-dddd-eeeeeeeeeeee",
  "entityTypes":["User"],
  "operationPayload":"{\"id\":\"urn:ngsi-ld:User:aaaaaaaa-bbbb-cccc-dddd-eeeeeeeeeeee\",\"type\":\"User\",\"username\":{\"type\":\"Property\",\"value\":\"user@mail.com\"},\"roles\":{\"type\":\"Property\",\"value\":\"stellio-creator\"}}",
  "contexts":["https://easy-global-market.github.io/ngsild-api-data-models/authorization/jsonld-contexts/authorization.jsonld","https://uri.etsi.org/ngsi-ld/v1/ngsi-ld-core-context-v1.7.jsonld"]
}
- Create a group
{
  "operationType":"ENTITY_CREATE",
  "tenantName": "urn:ngsi-ld:tenant:default",
  "entityId":"urn:ngsi-ld:Group:zzzzzzzz-yyyy-xxxx-wwww-vvvvvvvvvvvv",
  "entityTypes":["Group"],
  "operationPayload":"{\"id\":\"urn:ngsi-ld:Group:zzzzzzzz-yyyy-xxxx-wwww-vvvvvvvvvvvv\",\"type\":\"Group\",\"name\":{\"type\":\"Property\",\"value\":\"Group name\"}}",
  "contexts":["https://easy-global-market.github.io/ngsild-api-data-models/authorization/jsonld-contexts/authorization.jsonld","https://uri.etsi.org/ngsi-ld/v1/ngsi-ld-core-context-v1.7.jsonld"]
}
- Create a client
{
  "operationType":"ENTITY_CREATE",
  "tenantName":"urn:ngsi-ld:tenant:default",
  "entityId":"urn:ngsi-ld:Client:ffffffff-gggg-hhhh-iiii-jjjjjjjjjjjj",
  "entityTypes":["Client"],
  "operationPayload":"{\"id\":\"urn:ngsi-ld:Client:ffffffff-gggg-hhhh-iiii-jjjjjjjjjjjj\",\"type\":\"Client\",\"clientId\":{\"type\":\"Property\",\"value\":\"test\"},\"internalClientId\":{\"type\":\"Property\",\"value\":\"gggggggg-hhhh-iiii-kkkkkkkkkk\"}}",
  "contexts":["https://easy-global-market.github.io/ngsild-api-data-models/authorization/jsonld-contexts/authorization.jsonld","https://uri.etsi.org/ngsi-ld/v1/ngsi-ld-core-context-v1.7.jsonld"]
}
- Update realm roles of a user / group / client
An array of realm roles is sent, it is empty if the subject has no longer a realm role.
{
  "operationType":"ATTRIBUTE_CREATE",
  "tenantName": "urn:ngsi-ld:tenant:default",
  "entityId":"urn:ngsi-ld:Client:ffffffff-gggg-hhhh-iiii-jjjjjjjjjjjj",
  "entityTypes":["Client"],
  "attributeName":"roles",
  "operationPayload":"{\"type\":\"Property\",\"value\":[\"stellio-creator\"]}",
  "updatedEntity":"",
  "contexts":["https://easy-global-market.github.io/ngsild-api-data-models/authorization/jsonld-contexts/authorization.jsonld","https://uri.etsi.org/ngsi-ld/v1/ngsi-ld-core-context-v1.7.jsonld"]
}
- Add a user to a group
{
  "operationType":"ATTRIBUTE_CREATE",
  "tenantName": "urn:ngsi-ld:tenant:default",
  "entityId":"urn:ngsi-ld:User:aaaaaaaa-bbbb-cccc-dddd-eeeeeeeeeeee",
  "entityTypes":["User"],
  "attributeName":"isMemberOf",
  "datasetId":"urn:ngsi-ld:Dataset:isMemberOf:zzzzzzzz-yyyy-xxxx-wwww-vvvvvvvvvvvv",
  "operationPayload":"{\"type\":\"Relationship\",\"object\":\"urn:ngsi-ld:Group:zzzzzzzz-yyyy-xxxx-wwww-vvvvvvvvvvvv\",\"datasetId\":\"urn:ngsi-ld:Dataset:isMemberOf:zzzzzzzz-yyyy-xxxx-wwww-vvvvvvvvvvvv\"}",
  "updatedEntity":"",
  "contexts":["https://easy-global-market.github.io/ngsild-api-data-models/authorization/jsonld-contexts/authorization.jsonld","https://uri.etsi.org/ngsi-ld/v1/ngsi-ld-core-context-v1.7.jsonld"]
}
- Remove a user from a group
{
  "operationType":"ATTRIBUTE_DELETE",
  "tenantName": "urn:ngsi-ld:tenant:default",
  "entityId":"urn:ngsi-ld:User:aaaaaaaa-bbbb-cccc-dddd-eeeeeeeeeeee",
  "entityTypes":["User"],
  "attributeName":"isMemberOf",
  "datasetId":"urn:ngsi-ld:Dataset:isMemberOf:zzzzzzzz-yyyy-xxxx-wwww-vvvvvvvvvvvv",
  "previousPayload": "",
  "updatedEntity":"",
  "contexts":["https://easy-global-market.github.io/ngsild-api-data-models/authorization/jsonld-contexts/authorization.jsonld","https://uri.etsi.org/ngsi-ld/v1/ngsi-ld-core-context-v1.7.jsonld"]
}
- Update the name of a group
{
  "operationType":"ATTRIBUTE_UPDATE",
  "tenantName": "urn:ngsi-ld:tenant:default",
  "entityId":"urn:ngsi-ld:Group:zzzzzzzz-yyyy-xxxx-wwww-vvvvvvvvvvvv",
  "entityTypes":["Group"],
  "attributeName":"name",
  "operationPayload":"{\"type\":\"Property\",\"value\":\"New group name\"}",
  "previousPayload": "",
  "updatedEntity":"",
  "contexts":["https://easy-global-market.github.io/ngsild-api-data-models/authorization/jsonld-contexts/authorization.jsonld","https://uri.etsi.org/ngsi-ld/v1/ngsi-ld-core-context-v1.7.jsonld"]
}
- Delete a user / group / client
{
  "operationType":"ENTITY_DELETE",
  "tenantName": "urn:ngsi-ld:tenant:default",
  "entityId":"urn:ngsi-ld:Group:zzzzzzzz-yyyy-xxxx-wwww-vvvvvvvvvvvv",
  "entityTypes":["Group"],
  "previousEntity": "",
  "contexts":["https://easy-global-market.github.io/ngsild-api-data-models/authorization/jsonld-contexts/authorization.jsonld","https://uri.etsi.org/ngsi-ld/v1/ngsi-ld-core-context-v1.7.jsonld"]
}